|
Table of Contents
1. Designer Overview
The software comes with a report designer. The design window displays text fields. (A text field in the design window does not display database information, but you can preview the information with a click Edit and Print Preview feature described later. This document describes how you can move information, change fonts, add color, import picture files, and more.
Note: In formatting, the rule is-select, then do.
With the designer you can:
a. Move information
b. Draw lines and boxes
c. Enter text
d. Choose fonts
e. Add color
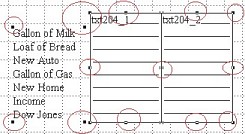
f. Import pictures
g. Delete information categories
 2. Using The Designer 2. Using The Designer
When you click on the Design button from within the recipient window, the designer window appears with your greeting template. Each template consists of a group of text fields. Each databases in the software is linked to a print template text field. Each text field has a field code, and each print template links different databases to the field codes.
Each print template links information to different fields. We offer one example using the News print template below. You can determine which field codes are assigned to each print template by using the click Edit and Print Preview feature found in the designers Edit menu. Determining what data is linked to a specific field code is important if you want to make changes to only a specific field.
3. Field Codes
The following map shows what databases are linked to which field codes in the News print template.

Field Code............................ Database
person .................................. Enter Name field
what_brthday...................... Report date
txt015_1................................ Birthstone
txt015_2................................ Birth sign
txt100_1................................ President and Vice President
txt612_1................................ Events of the Month
txt340_1................................ Sports
txt204_1................................ Back then Cost of Living
txt240_2................................ Today's Cost of Living
txt204_3................................ Shared Birthdays
txt340_2................................ Popular Music
txt340_3................................ Academy Awards
txt340_4................................ Personal Message
4. Editing Text fields
The historical database text fields have a label starting with the letters "TXT." The events of the month, sports, movies, and the other categories of information print in these text fields. Any changes made to the "TXT" text fields affect the entire block. After making changes to the text block, choose click Edit and Print Preview to see how your changes will affect how it prints.
NOTE: Do not make changes to Report Expression as this will result in crashing the software. If this occurs, you need to restore the original print template.
5. Choosing a Font
Note: In formatting, the rule is select, then do.
Click (to select) a text field. From within the design window, click on the desired text or text field. Next, click on the Format menu pad then choose the
 Fonts menu option. The font manager will appear. Choose your font and style. The software uses the Windows font manager and all fonts available in the font manager can be used in your template. Fonts menu option. The font manager will appear. Choose your font and style. The software uses the Windows font manager and all fonts available in the font manager can be used in your template.
Fonts and print alignment
The greeting forms used with the software require that the text align with pre-printed category headings. Choosing too large or too small a font can create an alignment problem. This alignment issue is something to keep in mind when modifying the News print template. The News print template is set to align to the pre-printed greeting forms, forms that include pre-printed category headings.
 6. Color Options 6. Color Options
A note about using color in your greeting. You can make your greeting colorful by adding color to text, borders, filling shapes, or to the blank space in text fields. You also can draw colored lines and shapes with the software drawing tools. Click on the object to which you would like to apply color. From the color palette, select the foreground or background button. The foreground option is for applying color to text. The background option is for filling blank space in text fields or filling a shape with color.
7. Toolbox

The designer toolbox is the row of buttons at the top of the Design Window. These tools allow you to select objects, label, field (not used), draw lines, draw rectangles, draw rounded rectangles, import pictures, align, and bring objects forward and back.
 8. Selecting Objects 8. Selecting Objects
To select an object in the Design Template Window, click the selection pointer the click on the object. To select multiple objects, SHIFT+click on each object or drag the selection marquee around several objects.
9. To use the selection marquee
Position the pointer outside the object to be selected. Drag the selection marquee around the desired objects. Release the mouse button. All objects enclosed in the marquee are selected. Objects that are partially contained in the marquee are selected as well. To select all the objects click on the menu bar option Edit and Select All. When multiple objects are selected, they act as one object when moved, edited (cut, copied, pasted) or deleted.
10. Un-Selecting Objects
To un-select all selected objects in the Design Window, position the pointer off the selected objects and click
11. Sizing Objects
A selected object has handles, which are small boxes in the corners and on the sides of the object. To re-size the object, point to
 one of the handles and drag until the object is the desired size. If the Snap to Grid option on the format menu is checked, the object is sized in grid increments when you drag it. The size of text objects is determined by the size and the font and the length of the text, so text objects are not sized the way other report objects are. one of the handles and drag until the object is the desired size. If the Snap to Grid option on the format menu is checked, the object is sized in grid increments when you drag it. The size of text objects is determined by the size and the font and the length of the text, so text objects are not sized the way other report objects are.
12. Moving Objects
To move an object, drag it to a new location then select it and use the arrow keys. If Snap to Grid is checked, the object will move according to grid settings when you drag it. The arrow keys move the object one pixel at a time, which is useful for "fine tuning" object positions.
 13. Editing Text 13. Editing Text
In the Design Window, click the label tool (A) and move the mouse pointer to where you want to add text and begin typing. Do not add text inside text fields, and do not alter the name of a text field. There is a limit to the number of letters you can type in a single entry. You will know when you have reached the letter limit when text stops appearing on the form. If you need to continue with more text, click the text tool in a new location, type the text, pick the select objects tool, click on the text and drag it until it aligns in a continuing flow.
 14. Drawing Lines 14. Drawing Lines
To draw a vertical or horizontal Line in your report or label, click the line tool, position the pointer where you want an end of the line to be, and drag until the line is the desired length.
 15. Drawing Rectangles 15. Drawing Rectangles
Click the rectangle tool button. Position the cursor where you want a corner of the rectangle to be, To draw a rectangle in your window, click the rectangle tool, and drag until the rectangle is the desired size.
 16. Drawing Rounded Rectangles 16. Drawing Rounded Rectangles
To draw a rectangle with rounded corners in your window, click the round rectangle tool, position the cursor where you want a corner of the rounded rectangle to be, and drag until the rounded rectangle is the desired size.
 17. Inserting Pictures 17. Inserting Pictures
You can insert a variety of bit map pictures in your greeting. Click the picture tool, position the cursor where you want a corner of the picture to be and drag until the picture frame is the desired size and the Report Picture dialog will open. To include a bit map (BMP) picture in your report, choose the File radio button, then click the button to the right of the file field to search the drive for your intended picture file. Report picture dialogue window functions not supported include field and print when.
The report picture dialogue window functions are self explanatory and we will not go into extensive detail about their use at this time - clip picture, scale picture, retain shape, scale the picture, fill the frame, float, fixed relative to top band, fixed relative to bottom band.
18. Menu Options
19. File
20. Save As


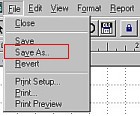
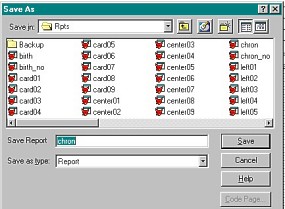
The layout designs can be modified through the designer. You can save your modified layout designs. Use the Save As file menu option to give your design a unique name. Be sure to select Report in the save as type field.
Steps to saving a design:
The design name is not to be more then 6 letters in length
The design name should not include any spaces
The design name should not include numbers (characters only)
The design should be saved in the RPTS folder.
The software looks for the print templates in the RPTS folder. If the design is saved in another location, the program will not have access to it. If your saved design is saved correctly, the name of the design appears in the recipient window in a field titled saved designs. If you have any problems with the name of the saved design appearing in the list of saved designs more then once, something has gone wrong with the design and it needs to be removed from the RPTS folder using windows Explorer.
21. Print Preview
Choose Page Preview to display the Page Preview dialog with a full page or actual size representation of the greeting.To toggle between the two representations, click on the displayed greeting or choose Zoom In or Zoom Out.
22. Zoom In
Choose Zoom In to display an actual size representation of a section of your greeting.
23. Zoom Out
Choose Zoom Out to display a full page representation of the specified greeting.
24. Edit

25. Copy
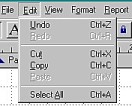
Selected object or objects can be are copied to the clipboard.
26. Paste
Object on the clipboard are pasted onto the form.
Select All
Selecting every object at once on a print template can be useful when making alignment alterations. Clicking Select All selects all objects on the print template. When selected, all objects move up when you click the up arrow key on your keyboard, and move down when clicking the down arrow.
27. Format
28. Bring to Front
Bring to Front brings selected objects to the front layer so that they show up on top of any overlapping objects.
29. Send to Back
Send to back sends selected objects to the back so that any overlapping objects show up on top of them.
30. Group
Group joins selected objects so that they can be manipulated as a single object.If, for example, you have a box drawn around a field and text that describes the field, you can group all three objects together and move, cut and paste them as if they were a single object.You cannot, however, change the font size, fill, pen, fill color or pen color of grouped objects.
31. Un-group
Un-groupseparates previously grouped objects so that they can be manipulated individually.
32. Snap to Grid
Moves selected objects to line up flush with the grid setting.If you have a series of fields, you can make sure that they line up perfectly by selecting them and choosing Snap To Grid.
33. Set Grid Scale
When Snap to Grid is checked (this is the default),an invisible alignment grid is set on so that objects are automatically aligned to the nearest grid line when they are sized or moved.The alignment grid corresponds to the grid size set in the Ruler dialog. You can override the alignment grid when moving or sizing an object by pressing Ctrl while dragging the object or object handle.
34. Font
The font is the style of text, which helps convey the tone of your greeting. Different font sizes will help your readers distinguish between different parts of your greeting, such as a heading and body text.
To change fonts you need to be in the design feature. Enter the designer by first entering a date in the birth date field, then click the design button. In the designer click a text field or object. This selects the item for font changes. Now locate format along the top menu bar, and click format. Click font in the drop-down menu. Select the font and font size in the font options menu.
Tip: You can preview the changes made to the print template when you are in the desktop publisher. Locate File along the top menu bar, click file. Click print-preview in the drop-down menu.
35. Text Alignment
Alignment displays a cascading menu that allows you to adjust the alignment and spacing of text blocks on your greeting.The cascading menu contains these options:
Left -- Left justified selected text
Center -- Centers selected text
Right -- Right justified selected text
Single Space -- Displays selected text single-spaced with blank lines between lines of text
1 1/2 Space -- Displays selected text with one-and-a-half blank lines between lines of text
Double -- Displays selected text double-spaced with one blank line between lines of text
36. Mode
Mode displays a cascading menu that allows you to determine whether the selected object is opaque or transparent.
Opaque -- Prevents objects behind the selected object from showing through the selected object.
Transparent -- Allows objects behind the selected object to show through the selected object.
These menu options only affect text objects, rectangles and round rectangles that have been given fill patterns.
|

