Running CardWare for the first time
Birthday Greeting Print Introduction
8.5-by-11-inch Greeting Certificates
Card Insert Printing Introduction
Greeting Card Insert Selection Window
Choosing Different Card Insert Content
Previewing a saved Card Insert Template
Finding Names after importing or Saving Names to List
Import reports from previous version
step-by-step to Moving Saved from one computer to another
step-by-step for inserting names from earlier program using backup and restore
Step-by-step guide to Import names from a prior version using Utilities
Printing, Printing labels, lists, email, pdf
Email Greetings through www.News-of-the-Past.com or www.Clientbirthday.com
Step-by-Step guide to editing Certificate Greeting Content
Step-by-Step guide to editing Card Insert Content
Import reports from previous version
Editing a template in the Designer
The installation procedure is simple. From Windows Explorer or My Computer, browse to the CardWare CD and double-click on the setup icon to start the installation. Some users may have downloaded CardWare from the Internet. Replacement downloads are available. To request a replacement, gather details about the original purchase, such as the name in which the order was placed, the name of the program you need to replace, the purchase date, and the purchase location. Email this information along with a request for a download to support@clientbirthday.com.
The first time you run CardWare, a window opens, giving you the opportunity to import names and greetings saved in an earlier version, if you wish. You don’t have to import now. CardWare’s Utility menu includes options for importing at a later time. You can do almost everything you need to in CardWare from a single functional window: the Recipient window, where you can select all your greeting options.
You can send greetings in two ways: The first method is to create a list of contacts by entering the desired names and birth dates, then clicking on the Add Name to List button. Then select (double-click on) the names in the list, and finally click on Print Options to generate the greetings. The second method is to simply enter one name and birth date, and click on Print Options to print a single greeting.
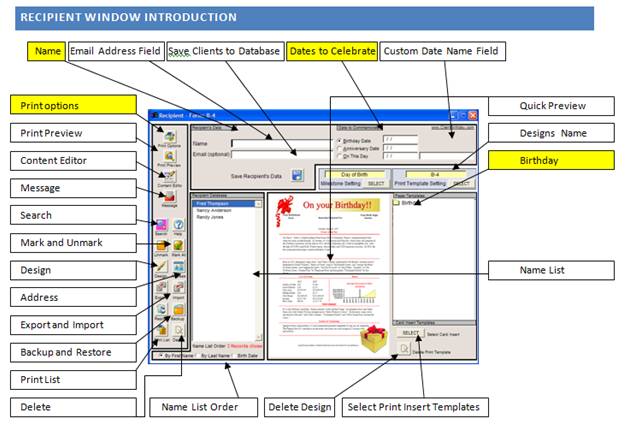
On startup, you will see the Recipient window. This is where it all happens. Creating a greeting is easy. The four steps you take to print your first greeting appear in the yellow labels:
1. Enter a name.
2. Enter a date.
3. Select a Birthday Print Template.
4. Click on Print Options.
You'll quickly learn how to print attractive birthday greetings—but CardWare is capable of doing much more. This instructional guide will show you how to utilize the program to its fullest potential.
To generate a single greeting, take a look at the data entry section of the Recipient window, shown below:
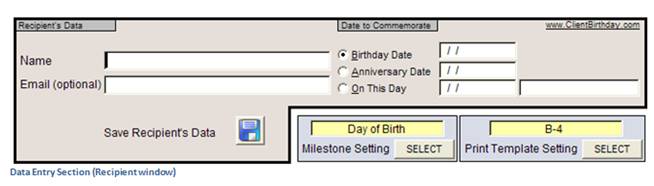
Entering a name is optional when printing a single greeting, but a name is required when saving a greeting to the internal customer database (cust.dbf). Enter a date in one of the three date fields—Birth Date, Anniversary Date, or On This Day—in MM/DD/YYYY format. Once you’ve entered a date, click on the Print Options button to print a greeting, or click on the Add Name to List button, then double-click on the name to select it for printing. Clicking on Add Name to List saves names to the customer database. You can restore a name to the name list for printing by searching for it (click on Search).
Note: In Date Selection, you will see radio buttons to the left of the date titles. When you click on these, you are selecting the date of focus (Birthday, Anniversary, or On This Day). Make sure the customer database contains data for the date field you have selected or entered.
To print the greeting, first enter the name of the person for whom you want to print a greeting. You can also print a greeting without entering a name, but if you want to save the data in the name list, you must enter a name. You cannot save a date without a name to the customer database.
Greetings without a year
In the case of a birthday greeting, you can omit the year (but you must enter a month and day). If you don’t enter the year, the program will ask you to select a milestone other than Day of Birth; for example, (4th Birthday). This feature is useful if you know the month and day of a recipient’s birthday, but not the year. For Anniversary Date or On This Day, you must provide a complete date, including the year. Also, you can use the Milestone feature to generate a birthday greeting when you do not know the year of birth. For example, you could enter a day and month for Birthday Date. When you click on Print Options or Print Preview, you can select a Milestone, such as 20th Birthday. The resulting greeting will be titled “On Your Birthday 20 Years Ago.”
To the right of the On This Day date field is a text field. Here you can enter an occasion description that you want to include in the greeting. For example, you could enter “A Year Since Your Last Appointment” to remind a patient that it’s time for a dental exam. This feature provides a very effective marketing instrument.
8.5-by-11-inch Greeting Certificates
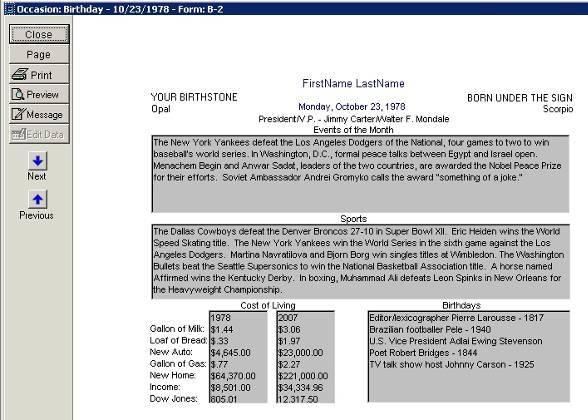
CardWare has 15 unique print templates, and you can design your own. You select the type of greeting you want to send from the list of templates in the Print Templates window. In the following picture, the Birthday folder is selected. You can open the appropriate category by double-clicking on the folder’s icon. With the folder open, select a greeting by clicking on its number.
![]() As soon as you
select a template, its picture appears in the left window. This is not a print
preview of the date you have entered; it is simply a preview of the template
with generic data.
As soon as you
select a template, its picture appears in the left window. This is not a print
preview of the date you have entered; it is simply a preview of the template
with generic data.
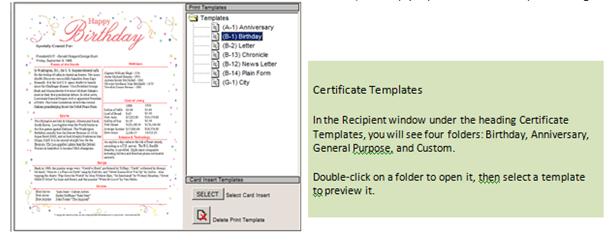
Note: Saved designs go into the Custom folder. Previews do not exist for designs in the Custom folder, so when selecting a custom design, do not expect to see it in the preview window.
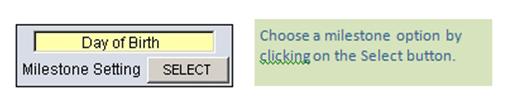
When you send greetings annually to your clients, you want to avoid repeating the content. You want them to receive something fresh and interesting every year. That’s why we include the Birthday Milestone feature. It allows your CardWare software to generate an almost endless variety of new greetings.
The yellow text box says “Day of Birth,” which means that the greeting will contain the events for the date of birth, but you can select other years as well.
In subsequent years you can focus the birthday greetings on different dates. Simply enter the date of birth and set the program to print by highlighting when the client turned 4 years old, or 16, or any age you like.
Once you set the Birthday Milestone, the software retains that setting and automatically uses the appropriate content for each greeting you print.
Example: The first year that you are sending a CardWare greeting, focus on what happened when the client was born. In following years, select a birthday milestone button: 4th Birthday, for example.
Selecting the Birthday Milestone 4th Birthday button adjusts the content for the appropriate date, then prints the following heading:
Turning back the clock to your 4th birthday
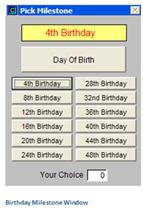
In this example you enter the client’s date of birth, and the program advances the date of the birthday greeting four years and prints the events and cost of living for the date on which your client celebrated his or her 4th birthday. Once you have selected a print template and entered a birthday or anniversary date, click on the Milestone Setting button. Next, select a milestone in the window that appears. You can select a milestone preset by clicking on the appropriate button, or you can enter a number of years in the text box (showing 0 in this picture). When you ave made your selection, click on the OK button to return to the Recipient window.
Print Preview
 Now you are ready
to preview your greeting. Click on the Print Preview button on the left side of
the window to see how the greeting will appear in print. If you are satisfied
with it, click on the Printer icon in the preview window to print, or close the
preview window and click on Print Options in the Recipient window.
Now you are ready
to preview your greeting. Click on the Print Preview button on the left side of
the window to see how the greeting will appear in print. If you are satisfied
with it, click on the Printer icon in the preview window to print, or close the
preview window and click on Print Options in the Recipient window.
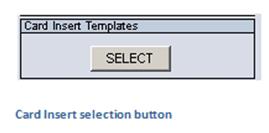
Card Insert Printing Introduction
CardWare offers the option to print on a greeting card. Buy any standard greeting card and insert CardWare data into that card. Although you may be able to print directly on a greeting card, depending on your printer’s capabilities, we recommend using our greeting card insert paper, available from Spectrum Unlimited LLC’s web site, https://clientbirthday.com.
To choose a greeting card template, click on the Select button under Card Insert Templates, as shown below (located in the bottom right corner of the Recipient window). A new window will open containing several tabs, each with a predesigned insert. These inserts offer various combinations of data, which you can modify by first selecting an insert, then clicking on the Content Editor button on the left side of the Recipient window.

On most printers, you insert cards or card inserts into the printer the same way that you would insert envelopes. Select the template best suited to your card. You will also find four text-alignment options and nine unique template tabs. Though you cannot change the layout of the card, you can edit the content before printing. Once you have selected a card design, click on the Content Editor button to modify the content before printing. Upon exiting the Content Editor window, you have the option to save the modified template in the Custom folder for later use.
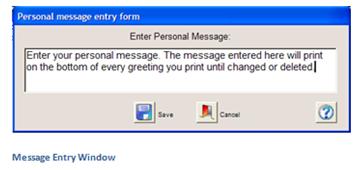
Sometimes you may want to include a custom message in a group of greetings without having to change each greeting individually. In such cases, click on the Message button in the Recipient window and enter text in the box that appears. Your custom message will be printed on your greetings, usually at the bottom. The font and position will vary from design to design.
You can easily replace default card template data. Only a predetermined set of databases fits a chosen data field, and only compatible database buttons become highlighted when you click on a gray text field.
Follow these steps to alter card content:
(1) Choose a card template from the Insert Template window.
(2) In the Recipient window, click on the Content Editor button.
(3) In the Content Editor window, click on a gray text field. Choose one of the highlighted database buttons on the left side of the window. Clicking on a highlighted database button replaces the default data with your chosen data.
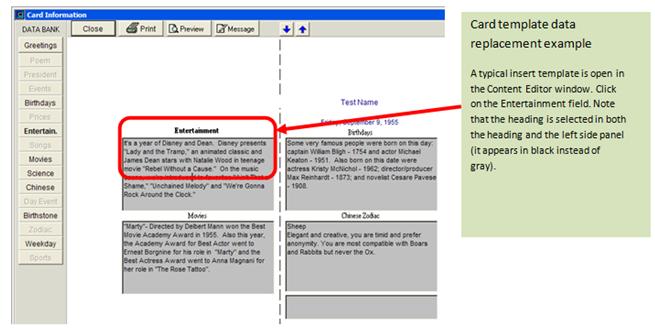

![]() To replace the default Entertainment data category with
Science, you simply click on the Science button.
To replace the default Entertainment data category with
Science, you simply click on the Science button.
![]()
![]() In this example you could have chosen other
data categories. When you click on a field, the titles for those databases with
a compatible word count turn from black to gray.
In this example you could have chosen other
data categories. When you click on a field, the titles for those databases with
a compatible word count turn from black to gray.
When you exit the Content Editor window, the program checks to see if you modified the card insert, and if you did, a save window opens, giving you the option to save or cancel. If you are saving the modified card insert template for later use, give the insert a name. The renamed insert will appear in the Custom folder.
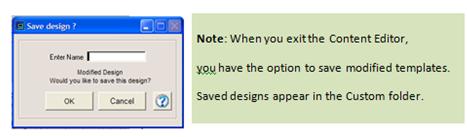
Click on the Content Editor’s Close button when you're done modifying the card insert template. In the Save Design window, you can enter a name, and then click on OK to save the design. Otherwise click on Cancel to exit the Content Editor without saving.
Modified card insert templates and certificate templates are stored in the Custom folder.
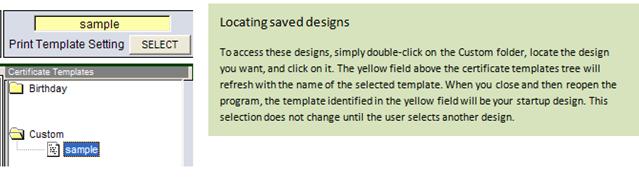
Previewing a saved Card Insert Template
When you select a saved design from the Custom folder, the design does not display in the Recipient window like the default CardWare greetings. To preview a saved design, open the Custom folder and click on a design in the list, then click on the Print Preview button.
Note: The name of a chosen design appears in the yellow print template setting field. See sample above.
Preview a custom design by entering a date of birth in the Recipient window, then clicking on the Print Preview button.
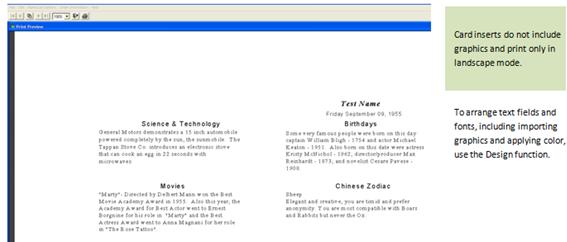
To print from within the Print Preview window, click on the Print icon in the upper left corner. Or you can close the preview window and click on the Print Options button in the Recipient window.
Above we discussed ways to print greetings and card inserts for a single person.
But you may want to maintain a database of your contacts. When you have created a database, instead of entering names and dates one at a time, you just select the names in the database that you want to print.
In the following paragraphs we will discuss how to create a database of contacts and use the search facility to select the group of contacts to whom you would like to send greetings.
In the left panel of the Recipient window, you will see a set of buttons. Click on the Address button to open the Client Date And Address Information window, shown below:

As you can see in the above picture, you enter the first and last name on one line. After you press the enter key, the first and last name get placed automatically in the correct fields. You must enter a name to make the entry valid. Apart from the name, you need to enter one of the dates to save the entry. Any one of the three will work—Birthday, Anniversary, or On This Day. In the address window you can navigate between the entries by clicking on Previous, First, Next, and Last the navigation buttons. Once you have completed an entry, click on Save, then click on the Close button to return to the Recipient window.
Note: When you are creating the database, you must enter the full birthday date. This is not the case in the main window, where you can just enter the day and month and print the card.
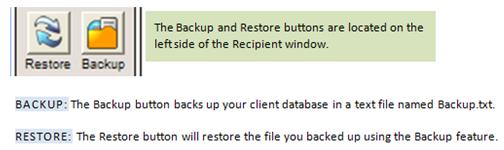
Note: You should always back up your client database (cust.dbf) to avoid losing your data. To back up from the Recipient window, look for the Backup button on the left side and click on it. This backs up all customer data to a file named Backup.txt.
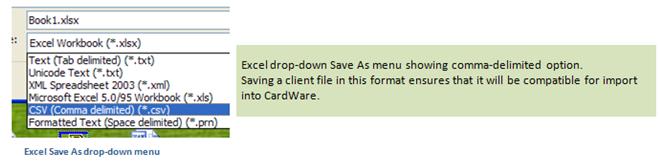
You can import contacts if you already have them in some format and would like to use the existing records rather than reentering them. Microsoft Excel is an excellent tool for preparing the file for import into CardWare.
When you click on the Import button, the application asks you to select a text file. This text file should be a comma-delimited text file; typically you can export in this format from an existing contact list in Microsoft Excel, a mail client, or a contact management program.

Once you successfully save a text file containing the client content for import, click on the Import button in CardWare’s Recipient window.
- Save a comma-delimited text file from your contact management program.
- Click on the Import button in the Recipient window. The Find window opens.
- Navigate to find the newly created text file containing your names, exported from your contact management program.
- Select the text file. The Mapping window opens.
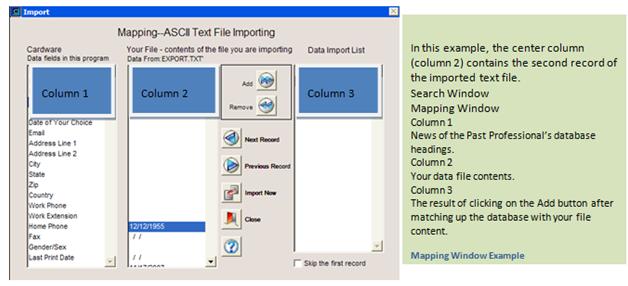
Mapping Window Instructions
- You selected the file and the Mapping window is open (see “Step-by-Step Text Import Procedure”).
- In the Mapping window, your data appears in the center column. Sometimes the first record is blank or contains column headers. In that case, click on the Next Record button until you come to a complete record containing a name and date (the minimum required data).
- If the name appears on two lines, as in the following example, in the left column click on First Name Alone. Then in the center column click on the stand-alone first name, and click on the Add button. Do the same for the last name and date.
- When you are finished pairing up data and fields, click on the Add button. The right column should resemble the example below. Your column may have fewer or more entries depending on how much data you are importing.
- When you are satisfied that the right column is complete, click on the Import Now button.
Finding Names after importing or Saving Names to List
When the program is finished importing, a small window pops up telling you the count (the number of names imported). If the count looks correct, you can assume the import went through without a problem. To verify the validity of your import, click on the Recipient window’s Search button. There you can do a date range or name search to find the records imported.
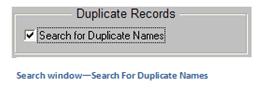
Because the import function appends records to an already existing cust.dbf file, it is possible to duplicate names already in the software, so you need to verify whether any records are duplicates. In the Search window, select Search For Duplicate Names, then click on the Search button.
If the program finds duplicate names, they will appear in the Recipient window name list. Here you can double-click on the records you want to delete (this selects them), then click on the Delete button.
In Excel, open the file containing the names and birth dates you want to export to a text file for importing into CardWare.
![]()
In Excel click on File, then click on Save As. For the format, select CSV (Comma delimited) (*.csv). This option automatically adds the extension .csv to the end of the file name.
- Enter a file name of six or fewer letters, without any spaces or numbers. An example of a compatible name is export.txt.
- The location where you save the file is very important. You must save it to the root directory of your C: drive. You cannot save it in a folder on your C: drive or on the desktop. An example of a compatible file name and location is c:\export.csv.
- Close Excel. On your desktop, click on the My Computer icon, or open My Computer from the Start menu. In My Computer, open Local Disk (C:), locate the file you exported from Excel, and right-click on the file name. In the menu, select Rename and change the extension to.txt. After you have changed the file extension, go to “Step 2—Importing.”

After saving the file to the root directory of your C: drive, open your CardWare program, click on Name List Options, and select Import Names And Dates.
- Navigate to your C: drive and locate the file you exported from Excel, then renamed with the extension .txt. Double-click on the file to open it in the Mapping window.
- Three columns display. On the left is the names field. In the middle is your file. If your file list is blank, you may have blank records saved in the database. Click on the Next Record button until your first record appears.
- If the first and last name are on the same row in your record, set up the file like this: In the left column, click on First & Last Name. In your record column, click on the first and last name. This will highlight both the field name and your data. Click on the Add button.
- If the first and last name are on separate rows in your record, set up the file like this: In the left column, click on First Name. In your record column, click on the first name, and click on Add. Repeat this process for the last name.
- Match up the Birth Date in the left column with the birth date in your record, and click on Add.
- When you are done matching the name and date fields, click on the Import Now button to import all records in your text file.

Once you’ve imported the names into CardWare, you will need to do searches to bring the group you intend to print into the name list.
- To search, click on the Search button. This opens the Client Date And Name search window.
- Click on Birth Date.
- You can see all the names in the list by searching for birth dates ranging from 01/01 (no year) to 12/31 (no year). Click on the Search button. This will bring up every record saved in the database.
- If you have a large number of names and dates, narrow your search results to just a couple of days or weeks. If you run out of paper while printing, or if your computer crashes in the middle of the print job, this could corrupt your database. To minimize this risk, work with lists containing 20 or fewer names at a time. And remember—always back up your software. It’s easy to do with the provided Backup button.
CardWare allows you to import reports from earlier versions of the software, so you can retain your custom layouts. Please note that you will find all reports imported in this version in the Custom folder, and after importing the reports, you will need to edit the list to complete the import process.
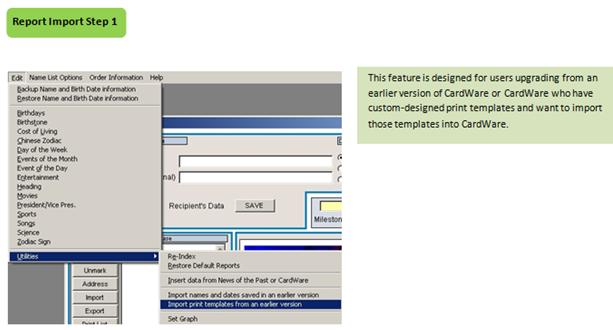
This feature is designed for users upgrading from an earlier version of CardWare or CardWare who have custom-designed print templates and want to import those templates into CardWare.
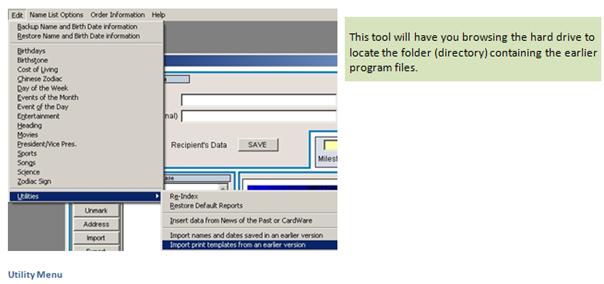
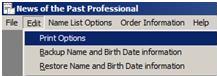
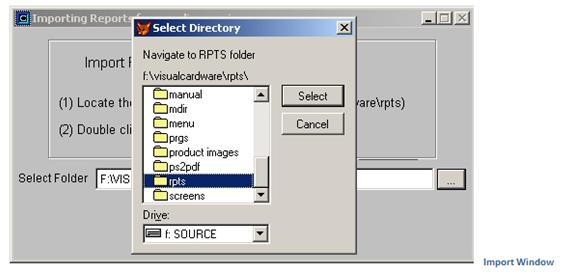
To access the import utility, go to the Edit menu and select Utilities, then Import Print Templates From An Earlier Version. The following image shows the menu layout.
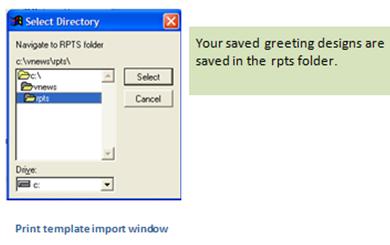
The program stores reports in the rpts folder, so you need to either enter the name of the folder with its full path, or navigate to it by clicking on the browse button (labeled with three dots) beside the Select Report (rpts) Folder field. Clicking on the browse button takes you to the Select Directory window, where you can find and select the rpts folder inside the directory of the old program. Note: You need to locate the rpts folder of the earlier version, not the current CardWare rpts folder in the vcardware folder. Click on the c:\ folder to go to the root directory, and then navigate to the folder containing the earlier version of the program. If you are not sure of the folder’s name or path, find the desktop icon that launches the old program. Right-click once on the icon, and click on Properties. The Properties option will give you the path to the old program, the root folder name, and the drive letter.
In this example we clicked on the browse button. Next we navigated to the 2007 CardWare folder named VCardWAre. In this folder are the reports we want to import.
Once you have found the rpts folder, click on the Select button to select it. In the next window, click on the Import Now button to import the previous version’s designs to the current version.
After importing templates, you need to restart CardWare before the list will refresh with the report templates.
![]()
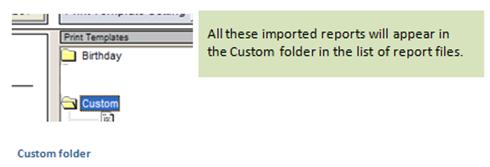
After importing the templates, open the Custom folder to see the group of imported templates. The first thing you will notice is that they are identified only by an icon and don’t have a name.
Every template in the rpts folder is imported to the Custom folder. Most are not needed because they duplicate designs that came with your program. To determine which designs you want to keep and which ones you should delete, click on the template; its name appears in the yellow field above Print Template Setting. If you want to delete it, click on the Delete Print Template button below the Print Templates list. If you want to keep the design, click on the Design button in the left panel to open the Report Designer window, where you can name the template.
Renaming print templates
The following picture displays the sample template named ANNIV opened in the design window. To rename this template, select the Report Designer window’s File menu; in the drop-down menu, choose Save As. We named the design ANNIV2.
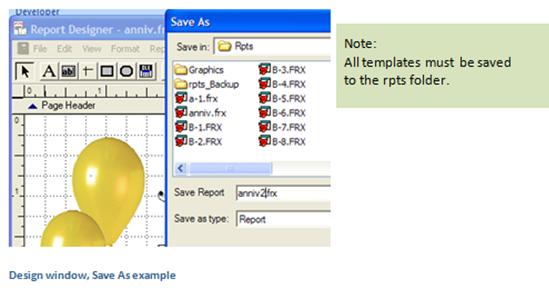
After renaming the report, close the Report Designer window. Back in the Recipient window, the renamed template will appear listed by name in the Custom folder.
In the main CardWare Recipient window, you can access the backup feature in two places. Choose Edit from the top menu; in the drop-down menu you will find the Back Up Name And Birth Date Information option. Or click on the Backup button in the lower left corner of the Recipient window. You should click on backup every day to keep your name list backup up to date. In the event that you need to uninstall and reinstall the software, if you have a current backup, you can simply click on the Restore button to restore all your saved names.
Backup Process
When you click on Backup or choose the backup option from the Edit menu, the customer database (cust.dbf) is backed up to an ASCII comma-delimited text file named backup.txt, located in the Dbfs folder. This file contains the entire database file, regardless of what names happen to appear in the name list box at the time you back up.
step-by-step to Moving Saved from one computer to another
There may be times when you need to move your saved CardWare names and dates from one computer to another. To do so, simply copy the backup file, backup.txt, to the same location on the new computer. Here’s how:
- Install CardWare on the new computer.
- On the original computer, click on Backup (or choose the backup option from the Edit menu). The window tells you where it is putting the file backup.txt.
- Locate and copy the backup.txt file onto any media you are using to transfer files to the new computer.
- Go to the new computer and paste the backup.txt file to the same location as on the old computer (the Dbfs folder).
- Run CardWare on the new computer and click on the Restore button, located in the left panel of the Recipient window.
Using the programs backup and restore function you can quickly bring names from one client birthday program into another. To do so, simply run the original program and click the backup button then copy the backup file, backup.txt, that backup saves in the DBFS folder. Then paste it into the DBFS folder of the newly installed program. Here’s how:
- Install CardWare.
- Running the older program, click on Backup (or choose the backup option from the Edit menu). The window tells you where it is putting the file backup.txt.
- Locate and copy the backup.txt file. Using Windows Explorer (click My Computer and open the hard drive to view all the folders) find the old programs folder (directory) and double-click it to view its contents. In that folder is another folder named DBFS, double click the DBFS folder, then locate and copy the backup.txt file.
- Paste the backup.txt file into the new programs DBFS folder. To help figure out the path to the DBFS folder for your new program, check the properties of the desktop icon. To do this go to the desktop, click the right mouse button on the new programs icon and from the menu click properties. The properties will tell you where the path to the working directory of your new program. Write that down.
- Using Windows Explorer, open the My Computer icon and open the hard drive to view all the folders. Find the working folder (directory) holding the new program files and double click it to view the contents. In that folder is another folder named DBFS. Open the DBFS folder and paste the backup.txt file.
- Run CardWare and click on the Restore button, located in the left panel of the Recipient window.
Step-by-step guide to Import names from a prior version using Utilities
If you want to import names saved in a prior version of the application, you can do it from here. It is available from Edit: Utilities: Import Data From CardWare Or Cardware. The same is true for customized print templates. It is available from Edit: Utilities: Import Print Templates From An Earlier Version. When the tool first opens it looks in the newly installed program folder. You need to navigate out from that folder clicking the button with 3 dots … to the right of the look in field. Navigate to, then open the folder containing the earlier program, and select the DBFS folder then follow the onscreen instructions.
Customer Database Tools
After your entries are complete, you can search them in various ways. Click on the Recipient window’s Search button to open the following window. The search window searches your customer database file named cust.dbf.

As you can see from the above picture, you can base your search on many options. In the right part of the window you can enter the range for which you want to search the data. The range input field changes depending on what kind of search you are doing. On the left side of the window are various radio buttons. When you select the birthdate radio button, for example, you will see an input field for a date range, and a Search For Email Address checkbox. If you want to search for a range of contacts who have email addresses, select this checkbox.
You can perform a global search that finds all records for a particular birth-date range, regardless of the year of birth. To do a global search, do not enter the year when searching on the birth date.
You can look for incomplete records by selecting the Records With Missing Data checkbox.
You can look for duplicate records. Select the Search For Duplicate Names, and then filter out unwanted entries from the results by deleting them from the Recipient window’s name list. To delete a name from the list, simply double-click on it, then click on the Delete button.

The date is to be entered in the standard window at of Month-Day-Year
Note: When searching on date of birth, do not enter the year unless your goal is to focus the search on people born in a certain year range—for example, everyone born between 1960 and 1965. If you want to see everyone born in the month of June, then omit the year in both date fields.
CardWare includes an automatic birthday reminder feature. This function only works with dates of birth and not with Anniversary or On This Day dates.
Setting a birthday reminder requires a simple setup routine. If you select this checkbox, then—depending on the number of days entered just above it—whenever you open CardWare, it will show a message box with the number of contacts for whom a birthday greeting is due.
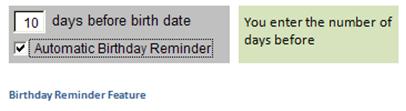
The program checks the customer database to find greetings you should print based on the number entered in the Days Before Birth Date field.
The calculation of the birth date is always from today to the number of days in the Days Before Birth Date field, as shown in the setup above. Note that this calculation does not take the year into consideration, because birth dates are recurring events.
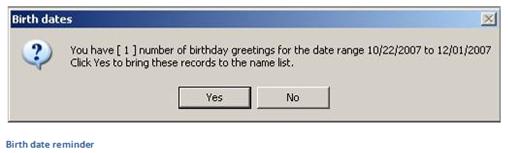
If you click on Yes, this option will bring the names to the Recipient Database box; otherwise this box will be empty.
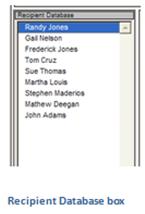
Assuming you selected the birth date reminder, the name list in Recipient Database is populated with names ready for printing. To print, click on the Mark All button in the left panel, or double-click on the names individually to select them. Then click on the Print Options button in the left panel.
Printing, Printing labels, lists, email, pdf
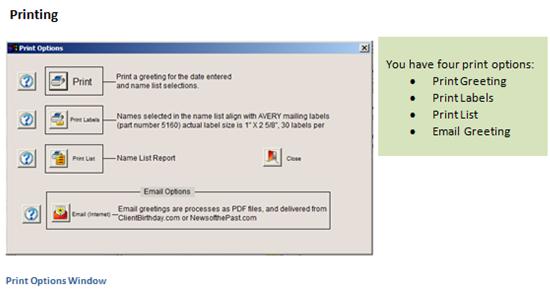
CardWare provides options not only to print greetings but also to print labels, generate PDF files of greetings, and email those PDF files to your contacts.
When you click on the Print Options button in the top left corner of the main Recipient window, a Print Options window opens, offering various choices.
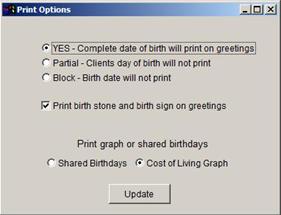 The Print Options tool is provided to switch on,
or switch off, birth date information. Switching off birth date information
keeps the clients date of birth private. The birth date will not print on
greetings.
The Print Options tool is provided to switch on,
or switch off, birth date information. Switching off birth date information
keeps the clients date of birth private. The birth date will not print on
greetings.
Print Choices Explained
YES – Complete date of birth will print on greeting

![]()
![]()
![]() Partial – Clients day of birth will not print
Partial – Clients day of birth will not print

![]()
![]()
![]() Block – Birth date will not print
Block – Birth date will not print
Print birth stone and birth sign on greetings
![]()
![]()
![]()
The Print Greeting button allows you to print one copy of a greeting or card insert for each selected name. When you click this button, the Print window opens, giving you the opportunity to select a printer and modify printer driver properties. If you need to print multiple copies of one greeting, use the Print window to set the print count.
This option lets you print the selected names and addresses to the standard Avery mailing label. To take advantage of this option, you must purchase labels with the correct dimensions. The Avery part number is 5160. The size is 1 by 2 5/8 inches, and each sheet contains 30 labels.

The Print List button gives you the option to print a data report consisting of names selected in the Recipient Database list. The report generated lists the data for each selected name to aid in editing the customer file, including the name, dates, email address, mailing address, and notes. If you need to modify a customer record, simply click on the Search button, then search for the record. When it appears in the list, double-click on that record, then click on the Address button to edit it.
CardWare has two options for sending email greetings: from within the application and through a Web-based service on www.ClientBirthday.com or www.NewsofthePast.com. See “Email Setup” for details.
This print option generates a text file compatible with our www.news-of-the-past.com and www.ClientBirthday.com web sites. This option is essential for users who want to deliver greetings from our Web server.
The user of CardWare can email birthday greetings via Spectrum Unlimited’s Web sites, www.news-of-the-past.com and www.ClientBirthday.com.
Step-by-Step export process for Website Email delivery
Step 1. Creating the Email Export File
- Click on the Search button. Under Search Category, click on Birth date. In the Search Range box, select the Search For Email Address checkbox, then enter a date range. Click on the Search button. If you want to search by email address, go to step 2. Otherwise go to step 3.
- If you know the email address you are searching for, click on the Search Category named Email. In the Search Range box, enter the complete email address. Click on the Search button.
- Search results appear in the name list. Select names for emailing by double-clicking on them, or click on the Mark All button.
- Click on the Print Options button or the Print List button to open a window with several print choices. To send an email, click on the Email Greeting button.
- A report opens previewing the selected records. You may print this list by clicking on the printer icon. When you close the preview window, the Save Greetings option displays. Click on Yes to write a file containing client names, birth dates, and email addresses. This is the file you will upload to our Web site for emailing.
- The first phase is finished. You can close CardWare and go to www.news-of-the-past.com or www.ClientBirthday.com.
Quick Review: By now you will have saved names and email addresses to CardWare, and then searched and saved those names to a file for uploading to our Web site.
Uploading the email export file
Step-by-Step Uploading
- First decide which web site you want to use for processing online greetings. Your choices are www.ClientBirthday.com or www.news-of-the-past.com. Both sites offer the same greetings. After registering, you will want to return to that site for emailing your greetings.
- Please visit one of our sites, register, and log in. When you click on the Login or Go button, the preview or personalize window opens. Click on the Email or Print button. It is recommended that you use our Free Samples to become familiar with this unique online service. You can change the look and content of our online greetings by clicking on the Personalize button.
- You will need to purchase greetings before uploading your CardWare email file. Click on the Purchase Greetings link, and when your purchase is completed, go back to the Print or Email window and click on Upload. This will open the Import page.
- In the Import page, click on the Browse button. Navigate to the file you exported from CardWare and select it. Then click on the Import button.
- If your file contains more than 25 emails, a message will tell you that the maximum batch size is 25. You are requested to prepare another export file containing 25 or fewer records.
- After uploading, the Bulk Mailing Page opens. Here you can verify the selected print template by clicking on the Preview First Record button. When you are ready to email the greetings, click on the box next to your selections, or select all names by clicking on the top box next to Name.
- To send, click on the Send Emails button.
- The Thank You page opens, and you can import another batch and preview an email status report.
If you choose to email greetings, make sure all the addresses you have selected do have an email address. Otherwise you will get the following message and you won’t be able to proceed.

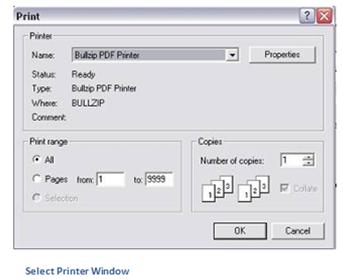
When you print a greeting, you can select the printer and adjust printing options. If you click on the Print button, a screen similar to this one will pop up, in which you can select and set up the printer. The printer setup window is also available from the Recipient window’s File menu.
Check out Time Traveler—CardWare at www.news-of-the-past.com. Here you can email or print CardWare greetings online. Sample greetings are free.
You have learned how to print a basic greeting or card insert. In this section you will find out how to customize each greeting by changing the design and content, giving it a personal touch.
CardWare has everything you need to modify the program’s databases, as well as a built-in desktop publisher that enables you to change the layout and look of your greetings. First we will discuss the database editor functions, then later in this section we will introduce you to the powerful Design button (the desktop publisher).
Content Editor Window
CardWare has a huge database of past events dating back to the year 1880. Sometimes you may want to add to or edit an existing event entry in the database to give it a more personal touch.
Note: Modifying and saving database content permanently overwrites the default data.
Note: You cannot open designs saved in the Custom folder in the Content Editor. This function is reserved for default designs.
- Select a certificate design from one of the folders under Print Templates.
- Select a name from your contact list, or enter a name in the text box in the Recipient window, with the date and category of greeting that you want.
- Click on the Content Editor button in the Recipient window. This will open a window in which you can edit the contents for the selected month and year.
- The first half of the report appears in the window. To access the lower half of the report, click on the Page button.
- The gray fields are your data fields. Left-click on a gray field, and the grayed-out Edit Data button in the left toolbar turns from gray to black. Click on Edit Data to open the selected record in the editor.
- Edit the text, then click on the Save button. When you’re finished, click on the Close button.
Because we aspire to make good-looking prints, certificate greetings have inherent text-alignment limitation that card inserts do not have. Although most people tend to print certificate-style greetings, we encourage you to explore card inserts and their flexible abilities.
1. Click on the Select Card Insert button under the Print Templates panel. Select a card insert design by clicking on one of the tabs.
2. Select a name from your contact list or enter a name in the text box in the Recipient window with the date and category of greeting that you want.
3. Click on the Content Editor button in the Recipient window. This will open the Card Information window, in which you can edit the contents for the selected month and year.
4. Gray fields are data fields. Left-click on a gray field. Each field is a different size; the buttons for those data categories whose content will fit within the field turn from gray to black.
5. Click on a black replacement data button and the selected content field is refreshed with different data.
6. To edit data, click on the Edit menu (in the upper left corner) and select the database from the drop-down list.
7. Save your modifications by clicking on the Close button.
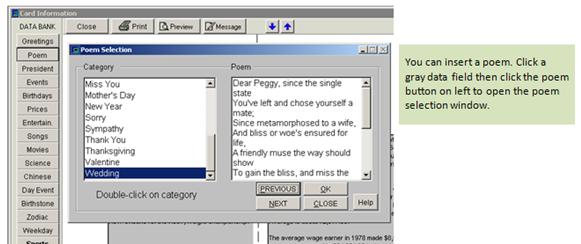
Card Information window (Poem Selection window open)
We provide database editors so the software user has the option to alter the content, update, or remove data he or she does not want to print. Previously in the Modifying a Greeting section we described a way to accomplish editing tasks on-the-fly while processing greetings, giving you a chance to read and edit content just before printing. But there’s another way to access the databases from within the Recipient window: The Edit menu.
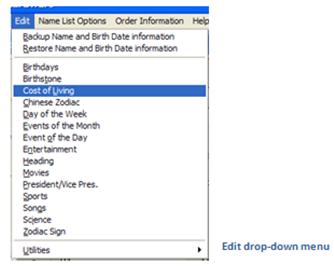
The Edit drop-down menu gives you access to the extensive databases contained in CardWare. The function for editing each database is the same: Simply click on the database name and the Edit Information window opens.
In the Edit Information window, you can edit the content for whatever year, month, and day you want. Please note that depending upon the event you are editing, the options will vary. For example, if you select Birthdays, then you will have option to go to a particular day and month but no year. If you select Cost Of Living, you can go to a particular year but no month, and so on.
For example, say you would like to edit the cost of living data. Click on Cost Of Living from the Edit drop-down menu. In the Edit Information window, enter the year you want to edit. If you want to append a new year to the database, do not click on Search, because the year has not yet been added. Simply enter the year and some data, and click on Save. Click on the Previous button to view the previous date, then click on the Next button to view the newly added year. Going between the previous and new dates helps you verify that you’ve successfully added the new record. When you are satisfied that you have saved the new year, enter the content for that year and click on the Save button.
Utilities Menu
CardWare has some built-in utilities to help you maintain your work and to make certain jobs easier. To access the utilities menu, locate edit on the top of the outer window. Clicking edit drops a menu containing tools for editing the programs content, and the option named Utilities.
The drop-down Edit menu gives you tools to edit the program’s database. It also has tools to re index databases, import and export data, and restore default print templates.
CardWare allows you to import templates from earlier versions of CardWare or CardWare, so you can keep your old layouts.
Please note that you will find all imported reports in the Recipient windows’ Custom folder.
Restore Default templates: If at any time you find that your standard templates have become corrupt or you have deleted some files by mistake, you can restore them using this option. It is available from Edit: Utilities: Restore Default Reports.
The following window appears once you select Import Print Templates From An Earlier Version.

Reports are stored in the rpts folder, so you need to either manually enter the name of the folder with its full path or navigate to the same by clicking on the browse button (three dots) beside the Select Folder text box. When you click on the browse button, you can navigate to the folder as follows.
The rpts folder contains the greeting form templates.
Once you have found the correct folder, click on Select. Note: You need to locate the rpts folder of the earlier version, not the current CardWare rpts folder in the vcardware folder. Click on the c:\ folder to go to the root directory, and then navigate to the folder containing the earlier version of the program. If you are not sure of the folder’s name or path, find the desktop icon that launches the old program. Right-click once on the icon, and click on Properties. The Properties option will give you the path to the old program, the root folder name, and the drive letter.
Remembering to backup your client data list is easy with the backup feature. Clicking backup creates a backup.txt file containing the entire content of the customer database file named cust.dbf. This backup file remains on the computer after uninstalling the program. So in the event it becomes necessary to uninstall then re-install CardWare, after the installation you can click on Restore to restore the name list from the backup file (if backup was used earlier).
Apart from the content, you can change a print template’s fonts, colors, pictures, and so forth. To modify a print template, select it, then choose a name from the Recipient Database list or enter a name and date.
After you have selected a name, click on the Design button in the left panel of the Recipient window. This will take you to the Report Designer. For this example we have selected the B-4 design in the Birthday category.
Fonts
Many of CardWare’s greetings use pictures and fonts to impart a colorful look. You can edit these elements. Left-click once on an object to select it, and then select an option from the menu bar to edit it. The drop-down menu will give you a host of options to customize the selected object. Format is one of the most commonly used options.
The most common reasons for making design changes are that you want to:
- Replace or alter fonts.
- Move or rearrange elements.
- Delete pictures or text fields.
You can do all this and more the aid of the Report Designer.
Step-By-Step guide to changing fonts
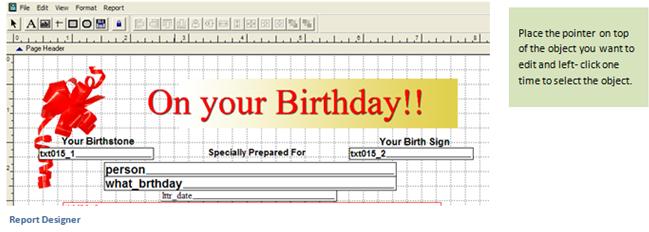
In the picture that follows you see a print template opened in the Report Designer, with the following two steps applied:
1. Place the mouse pointer on the words Specially Prepared For and left-click once. (If you double-click, a properties window opens. Simply close the properties window without making changes, then single-click on the words again.)
2. Select the Format menu and then select Font from the drop-down menu.

Object selection tool is used to make selections. Click on the arrow button to activate, then click on the object within the design window you want to modify.
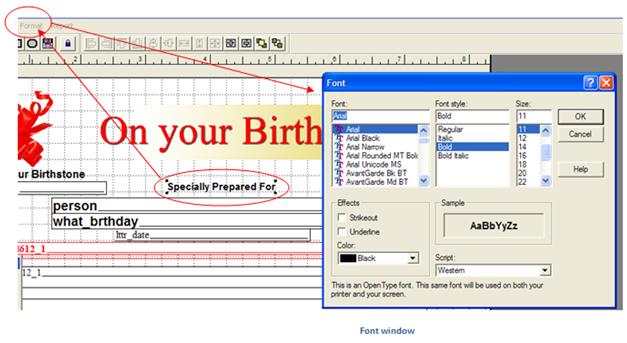
In the above example, we selected the words Specially Prepared For, chose the Format menu, and selected Font from the drop-down menu.
CardWare print templates have two styles of text, background text and data field text. You can edit both types to give them a different font, font size, and color. You can also move the font elements after selecting them, either using the keyboard’s arrow buttons or dragging with the mouse. In some cases text appears in an image file, and in this case you cannot modify it, only move or delete it. Once you have selected text, black squares display in each corner of the text block, indicating that it is ready to be moved, deleted, or modified.
Other Text Tools

The label or text (the capital A) tool is used for adding text to the template background, or for editing background text. To add text, click on the label tool, then click on the template background and type. To edit template text, click on the label tool, then click on the text you want to edit, and start typing. Use the object selection (arrow) tool if you need to move background text or a text field. Click on the object selection tool, then move the cursor to the object or background area. Click on the object, then use the arrow keys or drag to move the object, and the delete key to delete it.
Text Fields (Dynamic Text)
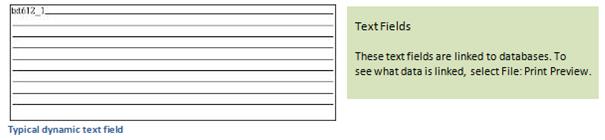
You can delete text fields from the template to make room for graphic files or background text, depending on your objective, but you can’t copy and paste text fields between templates. That is because the underlying database matches the text field to a database, and you can break that link (deleting the field) but you can’t add a new link.
You can edit a picture by clicking on it once. Selection dots appear around the picture, and you can move it around on the template, resize it, or delete it. All pictures used in the program must be bitmap (.bmp) files.
If you want to change an existing picture on the report and replace it with one of yours, double-click on it. You will see the Report Picture window, where you can select and link to a replacement picture. To find a picture, click on the open button (with three dots) to the right of the File text field, navigate to your picture file, and select it. If after you have changed the picture, your new image is overlapping existing objects, that means it is bigger or smaller than the area in which you’re placing it. In this case, you need to select an option from the area labeled If Picture And Frame Are Different Sizes. You can choose to clip the image, scale it and retain its shape, or scale it to fill the frame.
When placing graphics you will want to use the send to back option because in most cases you will want text to print on top if the inserted pictures. Send front and send to back option is in the Format drop down menu.
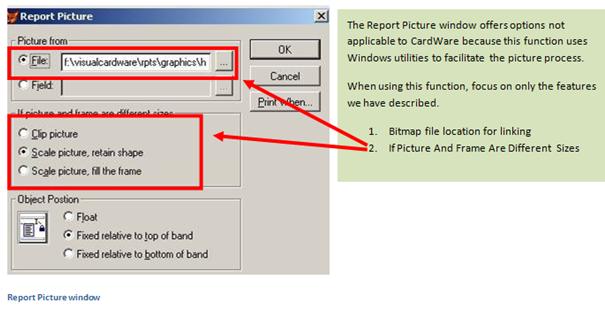
Scale Picture, Retain Shape maintains the aspect ratio. If, however, you want to change the width and height of the picture, select Scale Picture, Fill The Frame. This will allow you to resize the picture as you want, but it will also distort the image.
You can change the size by selecting the picture and then dragging it using the border handles. When you click on the border marks, your cursor will change automatically, letting you know that you are in resize mode.
If you want to move the picture to a different location, select it and drag and drop it in the desired location.
If you want to delete any picture in the greeting, select it and press the delete button on your keyboard. The picture will be removed from your report but not from the physical disk.
Adding a New Picture
In the designer is the OLE object linking tool. With this tool you can select a picture in .BMP format and place that picture in the print template. To insert a picture, click the OLE picture tool located in the designer on the top menu bar, Drag a box on the certificate in the designer to open the picture import dialogue box. For additional information about picture formats and dialogue box instruction, please review the section named Report Pictures above.
When you change the picture or add a picture, we strongly recommend that you copy your own picture file into the rpts\graphics folder. Please note that the pictures are never embedded into the report file, they are only linked. So if you link the picture file from any other folder and if that folder is not available when you are running the report, the application will generate an error.
If you copy the picture into the rpts\graphics folder, it will be always available (unless you remove it manually) and you will not have any issues when printing.
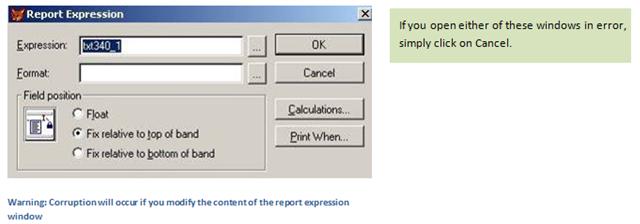
Note: If you double-click on a text field by mistake, the Report Expression or Text dialog boxes will appear. Do not make any changes in these boxes; just click on Cancel. They are triggered by the underlying FoxPro application and are not intended for the end user.
Once you are done with the changes on the report, you need to save it. If you are modifying an existing CardWare template, then we suggest that you save it as a new file and retain the original template. If you are modifying a template you have previously customized, it’s up to you whether you want to overwrite the existing file or save the redesign as a new file.
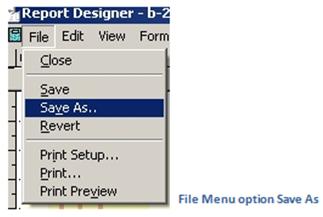
Design Window Save Feature
If you want to save changes you’ve made to a template in the Report Designer, you can save the changes in two ways: with Save or Save As in the File menu. To overwrite the existing file, click on Save. To save the file under a new name, click on Save As and you will see the Save As dialog box.
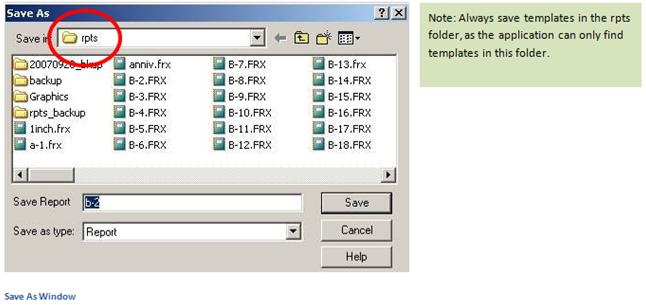
Save As Location
In the Save Report field, enter the file’s new name. The name should be eight characters or fewer, and should contain only alphanumeric characters without any spaces.
Open file dialog box appears while previewing template
This happens when a picture file is missing from its designated location, so the template engine pops up a dialog box asking for the missing picture.
Always save template pictures in the rpts\graphics folder.
Appearance of a fox picture instead of the designated picture on the template
This happens when a picture on the report is missing and you ignore the error message and proceed with the preview. By default the application will put in the FoxPro logo, as CardWare has been coded in that language.
To resolve this issue, open the template in design mode, double-click on the fox icon, and change the picture to the correct one from the rpts\graphics folder.
template files corrupted
Sometimes a system problem may corrupt your templates, or you may have made accidental modifications to the system that have caused the template to stop working.
CardWare has an option to restore the default reports. Select Edit: Utilities: Restore Default Reports from the menu bar.
This restore will only work on the default reports that come with the software. However, if there is a problem with a custom saved report, you need to delete it and re-create it.
Detail band is too large to fit on report
This error message can come up while you are previewing or printing a report. This happens if your default printer driver or the printer you have selected is set to print for a page on which the selected report won’t fit.
The solution is to open the printer properties and select a page size equal to A4 (width of 8 inches and height of 11 inches) or larger.
The option where you can change the page size varies depending on the printer model. Usually you will find it in Printing Preferences.
Duplicate names appear on the name list
This can happen if you have by mistake entered the same name twice or imported a name list file twice. The CardWare software doesn’t check for duplicate records, as we assume that you may have more than once contact with the same name.
There is an option to search for duplicate names in the Search window. Select that option to see a list of all matching names. It will see “Bill Gates” as identical to “Mr. Bill Gates.” You need to check the records manually and determine whether they are duplicates, then delete each duplicate by double-clicking on it and clicking on the Delete button.
Error when starting CardWare—missing ocx error
This error indicates that two Windows resource library files are missing from the computer. Nearly all Microsoft Windows applications install these files, but if your computer is new and you don’t have Microsoft Word, Excel, and other Windows Office applications installed, these files may be missing. The two files are comctl32.dll and comctl32.ocx, and their correct location is c:\WINDOWS\system32.
When installing CardWare does not copy comctl32.dll and comctl32.ocx to the system32 folder automatically, but if you need these files, you will find a copy of them in the CardWare install folder, c:\VCardWare. For more information about comctl32.dll, visit www.microsoft.com and search on comctl32.dll.